Friday, September 19, 2014

Link: 'First iPhone 6 Sold In Perth Is Dropped By Kid During Interview'


Everyone in the line: "OOOOOOOHHHHHHHHH!!"

I can feel his pain, while I sit here writing this post and waiting for tomorrow to roll by so I can pick-up my own iPhone 6.

Monday, September 15, 2014

Link: 'Apple Announces Record Pre-orders for iPhone 6 & iPhone 6 Plus Top Four Million in First 24 Hours'

Apple Press Release:
Apple® today announced a record number of first day pre-orders of iPhone® 6 and iPhone 6 Plus, the biggest advancements in iPhone history, with over four million in the first 24 hours. Demand for the new iPhones exceeds the initial pre-order supply and while a significant amount will be delivered to customers beginning on Friday and throughout September, many iPhone pre-orders are scheduled to be delivered in October. Additional supply of iPhone 6 and iPhone 6 Plus will be available to walk-in customers on Friday, September 19 at 8:00 a.m. local time at Apple retail stores.
Just to put this into perspective, this is double the number of 'pre-orders within the first 24 hours' of the iPhone 5 from two years ago.
Wednesday, September 10, 2014

How-To Make Your Own 'Two-Toned' Wallpaper

On monday, I published 'Wallpapers 10: Two-Toned' featuring a new wallpaper design inspired by a Daft Punk poster. Readers were also able to submit requests (you still can submit requests) but many also requested a guide on how I went about editing the images and what software I used. So, here it is, how-to make your own 'Two-Toned' wallpaper.

Software

I use Adobe Photoshop CC for Mac.

Finding An Image

While low-resolution images are still usable to a certain extent, you're much better off using a high-resolution image for your wallpaper. While you are searching for an image, make use of Google Image Search Tools which allows you to specify the image size you'd like Google to display.

Edit

For this guide, I will be using a Steve Jobs image to demonstrate how to design a Two-Toned wallpaper (the original wallpaper is available for download at 'Wallpapers 10: Two-Toned'). Also, if at any point you get stuck or cannot find a specific feature, try searching for the feature using Help in the Mac Menu Bar.
  1. Open a new document (Command-N) and paste your image. I usually like to start off by unlocking the Background layer by double clicking the Background layer and choosing "OK" however, this is not necessary.  Now that the document is all set up, you can start editing.

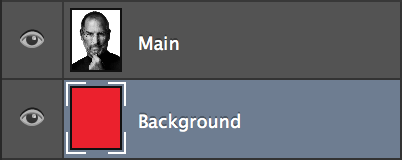
  2. If the Background layer is unlocked, select it to make it active. Otherwise, create a new layer (Shift-Command-N). Select the Paint Bucket Tool (G) and change the color to #ee1c24. Using the Paint Bucket Tool, fill the new layer. This will be the background; pick a different color if you desire. If the background layer is in front your main layer, drag it behind in the Layers panel. Despite no noticeable change taking effect, this step will help later on.


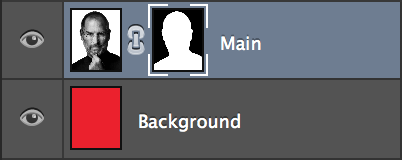
  3. Select the main layer containing the image and create a layer mask. A layer mask allows you to remove parts of an image by painting over them. Layer masks are preferred because they are non-destructive, meaning any part of the image can be recovered by erasing the painted area. The layer mask will be used to remove the background.


  4. Hold down the Magic Wand Tool to reveal the Quick Selection Tool (W). Select the Quick Selection Tool. Change the brush size to 5 pixels for precision and begin painting over the background. The Quick Selection Tool will begin selecting parts of the image that are similar. In this case, there is a clear contrast between the subject and the solid white background. This is not the case with complex backgrounds which will require you to trace around the outer edges of your subject. If you accidentally select part of the subject (which will happen), you can hold 'Option' to erase your selection.


  5. Once the entire image background is selected, make sure the layer mask is active. Switch to the Brush Tool (B), enlarge the brush size to 200 pixels and begin painting over the entire image. You will notice the selected area begin to disappear revealing the underlying layer that you created earlier. This is what a layer mask is useful for.


  6. If any parts of the background are left behind, repeat the steps above to remove them.

  7. With the mask layer active, head over to "Select" on you Mac Menu Bar and select "Refine Mask" (Option-Command-R). You can experiment with the different settings until the outer-edges are smooth. I usually keep the Radius within 0.5 - 1.0 pixels and adjust "Smooth" and "Shift Edge" accordingly.

  8. Next, right-click the Layer Mask thumbnail and select "Apply Layer Mask".

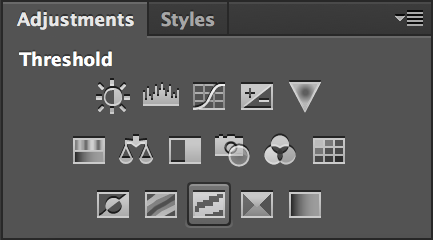
  9. Now for the magical step. Hide every layer except for the main layer by clicking the eye icon. Under 'Adjustments' select "Threshold". This will give your image the two-toned look. Adjust the threshold using the slider until you are satisfied with the results.


  10. Right-click on the new Threshold layer and select "Merge Down" (Command-E). Re-enable all layers by re-selecting the eye icon.

  11. Create another layer (Shift-Command-N) and place it in-between your main and background layer. Select the Paint Bucket Tool (G) and change the color to #efeaaa. Using the Paint Bucket Tool, fill the new layer. This will be the subject color. I will refer to this layer as "tone".

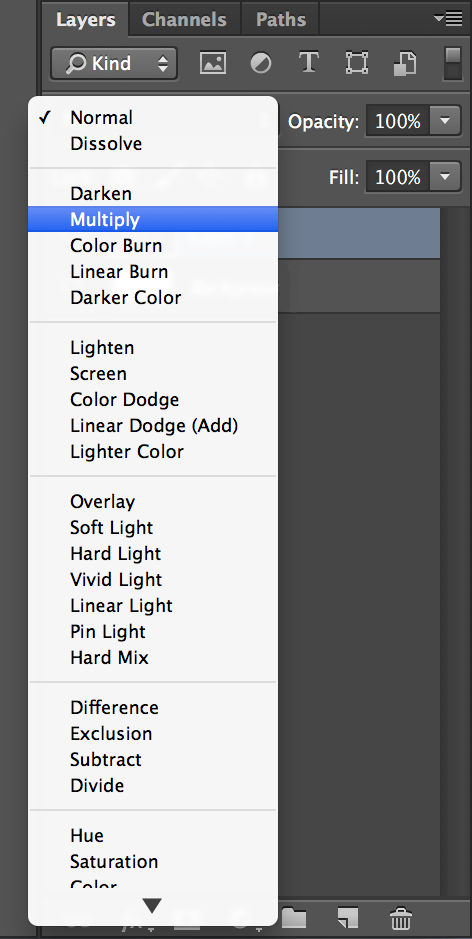
  12. Click the main image layer to make it active, select the drop-down menu above with "Normal" selected and change it to "Multiply". This is the blending mode which, in this case blends white to any color in the underlying layers.


  13. Switch the Quick Selection Tool back to the Magic Wand Tool (W) and adjust the tolerance to 90. Select the empty portion of the main layer, switch back to the "tone" layer you created two steps ago and then press "delete" on your keyboard.

  14. You may notice some of the color leaking outside the subject's outer-edge. This is caused by excessive Mask Refinement but can easily be fixed by using the Eraser Tool (E) to erase the extra color within the "tone" layer.
You can also choose to crop the image to fit your device's screen aspect ratio but, that's all there is to it. I hope that you respect my work as this post is intended for personal use only. If you choose to share your creations, all I ask is that you give me credit if this post helped you create Two-Toned wallpapers. A simple "Design by SUAPP" and providing a link to this blog is all I require.

Monday, September 8, 2014

Wallpapers 10: Two-Toned

Download all of the original, requested and brand new bonus wallpapers. If you missed the opportunity to request a wallpaper, you can still tweet me @AskSuapp with your request! Just include a link to a high-resolution image and specify the color. Also, you can check out 'How-To Make Your Own 'Two-Toned' Wallpaper'.

Thanks to everyone that participated and as always — enjoy!

Original


Requests


Bonus

Saturday, September 6, 2014

Apple's Mysterious White Building Is A Catwalk

Chris Matyszczyk, CNET:
I had been stimulated, you see, by news today that fashion bloggers and style poserati had been invited to shimmy along Apple's red carpet for the launch event Tuesday.

My mind whirred uncontrollably. First, I considered the strange white cube that Apple has built near its campus. Guarded by stern security, this edifice reminded me a little of my days in New York. I lived near Bryant Park, which enjoyed New York Fashion Week's adornment of a vast tent.

So the idea struck me: In that white box will be an Apple catwalk.
That's probably it. It makes perfect sense.

Link: 'The iWatch won’t be what you expect it to be…'

I really do hope the iWatch is nothing like what we expect, yet makes so much sense that we can't even remember how life used to be before it — just like the iPhone.

Friday, September 5, 2014

Link: 'Apple Dominating Shipping Capacity Out Of China With New iPhones'

TechCrunch:
Apple shipments via major concerns like FedEx and UPS are said to be ‘incredibly high’ for the holiday quarter, pointing to a massive number of iPhones and whatever other units Apple announces for the fall season incoming. The company is apparently flooding its channels with devices, causing shipments for other ‘top tier’ device makers to be delayed to make way for Apple products.

One other manufacturer was reportedly told by shippers that they couldn’t meet some deadlines because they were booked up servicing a ‘very important customer’.

Thursday, September 4, 2014

iPhone 6 Will Include "One-Handed Mode"

To deal with concerns that a bigger phone will make typing with one hand difficult (the current iPhone has a 4-inch screen), some changes to the design of the iPhones’ software interface will allow people to type or use apps with just one hand — there will be a one-handed mode that can be switched on and off, two employees said.
I guess that's how Apple will justify the increase in screen size on the next iPhone(s), after being opposed to larger screens for years due to the argument that single-handed use wasn't worth sacrificing in favor of a bigger screen on a phone.

Wednesday, September 3, 2014

'Update to Celebrity Photo Investigation'

An update from Apple concerning the celebrity photo leak:
After more than 40 hours of investigation, we have discovered that certain celebrity accounts were compromised by a very targeted attack on user names, passwords and security questions, a practice that has become all too common on the Internet. None of the cases we have investigated has resulted from any breach in any of Apple’s systems including iCloud® or Find my iPhone. We are continuing to work with law enforcement to help identify the criminals involved.
UA-42274431-1